Showing posts with label paint. Show all posts

Saturday, February 8, 2014

DIY Hairpin-leg Night Stand

 photo bb1-1.jpg


 photo bb4.jpg
 photo bb7.jpg
 photo bb2.jpg photo bb5.jpg
 photo bb3.jpg
 photo bb6.jpg 

Hello reader friends...

Goodness, I have been on quite the blogging hiatus! Life has been busy to say the least. I thought I would follow up with some promises I made on earlier posts to indulge in the design-y side of my life. I am happily surrounded by beautiful fabrics, finishes, furniture and lovely creative people every single day. This leaves little bits of my personal design life at the mercy of my late nights/weekends. Like most of you, I'm not a homeowner (yet!) and I am living on a dime...so let's get a little creative, shall we?

My roommate and I put together these night stands in an afternoon... after she primed, stained, and ordered materials, of course. Either way, the back story goes a little something like this: poor girls see beautiful tables at boutique furniture store, poor girls figure out how to makeshift their own, and WAAHLAAH!

Inspiration: The East Side Table $425 at local store.
These hairpin legs give a mid century modern feel and I love the idea of doing a coffee or dining table using these as well. The legs are sold for about $20 a pop and one table cost less than $100 to DIY. They're simple, refined and don't clutter a space (especially small spaces).


I hope you feel inspired and have a wonderful weekend! Thanks for reading :)


Thursday, August 1, 2013

Stay golden!

 photo GG2_zps7e916d5e.jpg
 photo GG6_zpsad819e80.jpg photo GG4_zps0955e5ff.jpg
 photo GG3_zps3f2d3195.jpg
 photo GG1_zps5f2da9e0.jpg


If you haven't heard, this weekend is the Texas Style Council blogger conference! I've been scrambling to get my booty in order...outfits, swap swag, photo gear...so exciting! I'm still learning how all of this works so it's fun to network and learn from others.

One networking tool we're all familiar with (blogger or not)...business cards! I feel lucky to work in the creative industry because essentially, you get to have a little bit more fun with the every day riff-raff. SO, instead of investing lots o' bucks into some serious branding, I decided to go with a simple "Hello, I'm Andrea" kinda card. I don't own my own business...I'm just here learnin' the ropes! This DIY was inspired by the lovely Camille Styles.

Make it: (estimated cost:  $25 - $30)
  • First, create a 3.5" x 2" design via Photoshop (PowerPoint could work too) and upload to your local Fedex/Kinko's office.
  • Next, use what ya got! I had some gold paint laying around and decided to spice up my cards with a fancy gilded edge effect. You could also make a fun design using watercolor paint or washi tape... be creative! 
{Tip}
If you plan on giving out your phone number, I recommend using Google Voice (especially when buying/selling on Craigslist). You can block spammers, send texts and there is even a voice mail feature. Thanks Google for having basically, everything.

We're all unique and business cards should not only reflect a brand but personality as well!  Don't let anyone tell you you're just a template...!:)


Wednesday, May 22, 2013

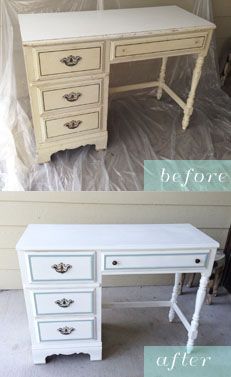
DIY Desk Restoration


 photo furniturediy_zpsc037d515.jpg

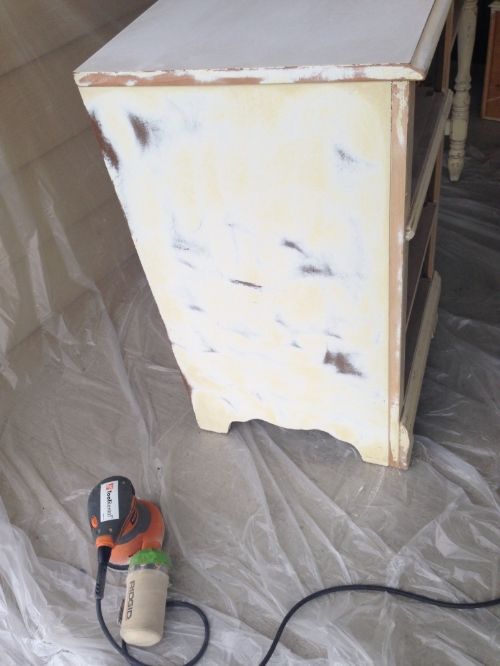
This is a lovely little weekend project for you little DIY'ers out there:) I spent weeks shopping around for a new workspace (desks are pricey, sheesh!) and when I found this gem on Craigslist for $50, I was sold! I love the spindle legs and the hardware is fantastic! It just needed a little elbow grease...


A restoration involving large furniture definitely requires an orbital sander...plus they are always nice to have around! They are very reasonably priced to purchase, or you can also rent them from Home Depot for about $20 for 24hrs. I also used a couple hand sanding sheets for those hard to reach spots.


RUSTOLEUM paint and primer gave us the best results... and is super easy to apply.
 *Disclaimer: Spray paint only in a highly ventilated area and wear protection!


Check out a helpful HOUZZ article I found here ! When giving furniture a face lift there are three important steps: PREP, PAINT and PROTECT. The last thing I did was add an accent color & line my drawers with some fancy shelving/drawer liners and waahlaaa!! The overall cost of the project was definitely in my budget and I think it is a piece of furniture that will last my bloggin' wear and tear!

Signing off from my new desk...:)


Friday, May 10, 2013

COLOR your world...


Color is such a powerful way to define our spaces, so I wanted to give a few tips on the subject. I recently painted my apartment and you could really tell a difference in the way adding color creates interest to a space. For instance, we originally had a drabby beige fireplace wall, causing it to appear washed out and dated (yuck!).


As you can see, adding the DARK charcoal grey made the fireplace and trim pop giving the space a more contemporary feel. The power of color is amazin! 

Get your supplies:

  • painter's tape
  • colorful paint of choice (I recommend BEHR paint + primer)
  • rollers
  • roller covers (the squishy foam things)
  • trays
  • shop towels (for messy hands)
  • drop clothes (to protect your carpet)
  • small/medium size brushes for edges 

When selecting your color...I think it's important to look at your surroundings and make sure you are selecting a shade that is cohesive with the rest of the space...countertops, flooring, existing walls (yes work with the existing paint even if it makes you cringe) etc.

Choosing colors can be overwhelming since the options are endless so.....get INSPIRED!!

This is the most important type of research a client or designer can do.... It can be as simple as finding a pillow you love and believe it or not, you can base an entire room off of your inspiration piece! If you haven't registered for HOUZZ ...do it! It is the ultimate mecca for inspiration and I always find really great articles on design and tips for my "dream home" :)....ahhh...one day....


 Here are a few of my general pointers that are good to remember:


Don't be afraid of color!


Use your color in various pieces around a room.


Break up a colorful room with a neutral wall color.

Need I say more?


I hope you're feeling inspired...thanks for reading!

Have a lovely weekend and give your momma a big ol' smooch for Mother's day!


Tuesday, March 26, 2013

When life gives you lemons...


I'm warming up with my first DIY post (beginner friendly)! So get your crafting pants on, ladies and gentlemen. As we all know, Austin has issued a "bag ban" against single use shopping bags. Womp, womp, womp...and the eyeballs roll....Okay let's stop the pouting and embrace it! Not only does it give us the opportunity to conserve but it forces us to be proactive, responsible and less wasteful. Listen, I'm not anti-plastic bags but if this gives me an opportunity to have the cutest grocery bags...I'll take it! Lets get started.


Supplies: canvas bag, fabric paint (1 color + 1 white), foam brush, painter's tape

Tape off your bag into sections to show gradient transitions.
Begin with your solid color at the bottom of your bag.


Gradually add white paint to achieve ombré colors.

Finished product!

 This project was simple and turned out great! Don't be afraid to play with pattern and color...you will have the most unique bag at the next farmer's market! I only did the stripes on one side and I'm happy with how it turned out. Two important things to remember...
  • Separate the bag with a piece of cardboard to avoid the paint bleeding through.
  • Remove the painter's tape while the paint is still wet to avoid the paint sticking to the tape and peeling unevenly.
  So when life gives you lemons...make those lemons beautiful! Happy *green shopping!